|
| 1. (mounting
mask) |
|
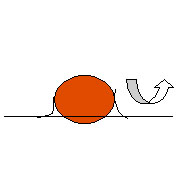 |
| 2. Blend
the rope into surface. |
|
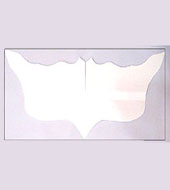 |
| 3.
(355mm(W) x 195mm(H) Paper pattern for
bird mask) |
|
 |
| 4. |
|
 |
| 5. |
|
 |
| 6. |
|
|
1.
Roll a 5mm thick, 300mm x 200mm rectangle light
grey sheet by Makin's Brand Roller. (To get
light grey, mix 125g white clay with 5g black clay)
Add white glue on the top surface of the mask. Cover
the entire mask with light grey clay sheet. Stick
on the nose first to prevent air bubble trapping
underneath. Then smooth the contour surface with
fingers and palm carefully. Prevent air bubble trapping
underneath along face mask contours. Use pin to
puncture air bubble if this happened. Press to release
air out by fingers.
2.
Trim
out the excess clay along mask edge by Makin's
Brand Mallet or scissors. Depress the 2 eyes
holes with fingers, then hollow them by Makin's
Brand Mallet.
3.
Get dark red color by mixing 480g red clay with
20g blue clay. Roll a 8mm thick, 355mm x 195mm rectangle
sheet by Makin's Brand Roller. Cut out the
bird mask shape according to the paper pattern by
Makin's Brand Mallet. Put a plastic wrapper
under the mask to prevent the clay sheet from sticking
on the table surface. No need to add glue on the
mask, then cover the upper half of mask with the
dark red pattern clay sheet. Prevent air bubble
trapping underneath by placing on the nose first.
Smooth the clay surface with fingers and palm when
covering the upper half of mask carefully. Place
the 2 ears of clay on table.
4.
Slightly lift up the forehead edge and the nose
part of the bird mask with fingers. Put some wrapper
underneath to prevent collapsing down. Hollow 2
eyes holes by Makin's Brand Mallet. Let dry.
Steps
of "Add on Method"
1. Roll a shape
2. Dip the whole piece in water
3. Put the whole piece on the surface to be added
on, press edges of pieces to taper them slightly
with your wet thumb and index finger, and blend
it into surface.
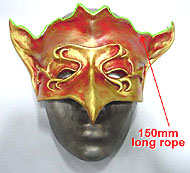
5.
Roll two 8mm diameter 150mm long rope, dip the whole
piece in water and put them along the lifted edge.
Hold the rope and press towards the mask by sliding
up and down the clay with your wet thumb and index
finger until the rope merge to the mask surface.
Use the same method for making ears pattern.
6.
For making eyes and forehead pattern: First, design
the pattern and roll different length teardrop shape
ropes with palm according to your design. Coil the
tails of the ropes, dip in water and then put along
the upper eyelid and forehead, wet your thumb and
index finger, then merge the edges.
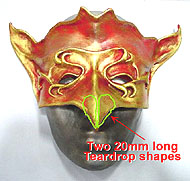
7.
For making broad nose: Roll two 20mm long teardrop
shapes and flatten with palm. Dip in water, put
at nose wings of the bird mask and smooth the gap
by wet fingernail. Slightly sharpen the bridge of
nose.
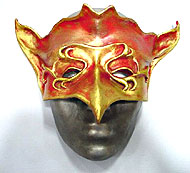
Finally.
Paint with acrylic color and add gold glitter glue
after dried. |