| Method: |
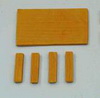 |
1. Making table
Roll a 5mm thick sheet from 40gm straw color clay. Then cut a 65mm x 40mm rectangle as
table top, four 25mm x 7mm rectangle as table legs by Mallet. Texture all the surfaces
to wood pattern by Feather Point. Let them dry and combine as table with glue. |
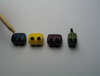 |
2. Making toy trains
Choose three different colors for carriages and one color for an engine. Roll 8mm
diameter clay balls (grape leaf, concord blue, plum wine) and press them into rectangular
cubes by a transparent plastic ruler for the carriages. Roll a 5mm diameter merlot
clay ball and press it to a square cube for the engine. Cut the end of toothpick
into square stamp and imprint windows on two sides of carriages. For wheels,
flatten 1mm diameter black clay balls and indent at the centers with plain rod.
Make 16 identical wheels and let them dry. Stick on the train afterwards. For
chimney, roll a 2mm diameter black clay ball into a small cylinder by plastic
ruler. Flatten both ends and let it dry. Stick it on the engine. |
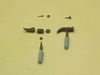 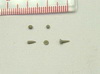 |
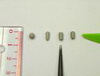
3. Making nail & hammer
For making nail: Roll a 2mm diameter grey clay ball and flatten it to a 2.5mm diameter
disc. Imprint a line at centre by Mallet as a nail head. For the pin, roll a 4mm long
teardrop from a 2mm diameter gray clay ball. Flatten larger end and stick it to the nail
head.
For making handle of hammer: Roll a 6mm diameter light blue clay ball into 10mm long
cylinder and flatten each end. Mark a line on the side for a handle. Prepare a small
gray clay ball and mark a hole at the center by a toothpick. Roll a 6mm long cone from a
4mm diameter gray clay ball and flatten the cone base. Attach one end into the hole of the
small clay ball and the other end onto the light blue handle.
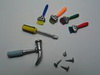
Making hammer hand: (1) Roll a 2mm diameter gray clay ball and flatten it to a 3mm
diameter disc. (2) Roll another 5mm long cylinder from a 4mm diameter gray clay ball and
flatten both ends. (3) Roll an 8mm long teardrop from a 4mm diameter gray clay ball and
flatten the round end. Cut the sharp end of the teardrop into two nail-pulling prongs by
clay scissors and bend with fingers. Connect the three parts as shown and stick the handle
on it. |
 |
4. Making paintbrush
For making handle: Roll an 8mm long teardrop from a 3mm diameter blue clay ball.
Prepare another 2mm diameter gray ball and pin a hole at the center by a toothpick.
Insert the sharp end of the blue handle into the hole with glue.
For making brush hair: Roll a 4mm long cylinder from a 2mm diameter gray clay ball.
Flatten the cylinder and one side. Pin two holes by a toothpick as shown. Then roll a
3mm long cylinder from a 2mm diameter yellow clay ball. Flatten it and cut brush hair
at one side by clay scissors. Connect all parts as shown. |
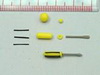  |
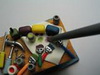
5. Making screwdriver
Roll a 12mm long cylinder from a 2mm diameter gray clay ball and flatten one end
for the metal part of the screwdriver. Let it dry. For the handle, roll an 8mm long
cylinder from a 5mm diameter yellow clay ball. Roll another 18mm long fine strip from
a 3mm black clay ball. Cut the fine strip into 3 equal parts and stick them on the
handle as shown. Make a 2mm diameter yellow clay ball and pin a hole at the center
by a toothpick. Connect them together as shown.
Paint the metal parts of all tools in silver for better effect. |
  |
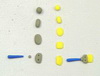
6. Making paint bottles
Choose any color and size you like for bottles. Roll out a cylinder from a clay ball
and flatten both ends. Indent the opening with a paint brush and mark with Mallet as
shown. Cut and stick small thin clay on surface as label. Fill the bottle with the
same color clay as the label. |
 |
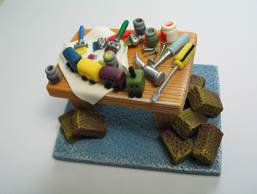
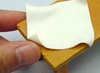
7. Set the table
Cut out a 30mm x 30mm white rectangular (0.5mm thick) clay sheet for working mat.
Manipulate the corners into natural position and stick it on the table. Let it dry.
After the mat dry, drop a small piece of color clay on top. Wet the clay with a little
water and rub it with a rod until the clay dissolves.
Finally, stick all miniatures in place. |
| |
| Designed
by - Dorothy Chan, MAKIN'S CLAY® Design
Team |