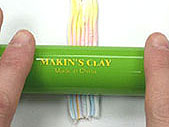
How to Achieve Best Results in Removing
Makin's Clay from Inner Packaging : |
|
With the Ultimate Clay Machine
- Remove outer plastic vacuum Bag.
- Open inner plastic wrapping using craft knife or clay blade and spread package flat on work surface. Do not remove inner plastic wrapping.
- Let clay sit for 10-15 minutes.
- Use hands or roller to lightly flatten clay against plastic wrapping. Do not remove wrapping.
- Insert clay and wrapping material together, clay side up, into Ultimate Clay Machine on #1 setting.
- Make one pass through clay machine with wrapping still attached.
- Turn clay 90 degrees and make second pass using #2 setting with wrapping attached.
- Peel wrapping from clay. If clay does not peel easily from wrapping, run clay with wrapping attached through clay machine one or two more times.
- After removing clay from wrapping, cut off amount of clay to be used immediately, and roll remaining clay into log or short plug shape. Store in air-tight container or cover with damp cloth for more immediate use.
Without the Ultimate Clay Machine
- Remove outer plastic vacuum bag.
- Open inner plastic wrapping and spread out a bit on work surface. Do not remove plastic wrapping.
- Let clay sit for approx. 10 minutes.
- Use hands or roller to lightly flatten clay against plastic wrapping. Do not remove plastic wrapping.
- Use a roller or even a straight sided drinking glass to roll the clay on top of the plastic wrapping for several times.
- Peel wrapping from the clay.
- After removing clay from wrapping, cut off amount of clay to be used immediately, and roll remaining clay into log or short plug shape. Store in air-tight container or cover with damp cloth for more immediate use.
|
| Techniques: |
|
| |
- Select a clean working area.
- Take a small piece of clay and place the remainder of the clay in an airtight plastic bag for storage or cover with wet towel while you are working.
- Knead the clay for few minutes; while the clay is still soft, it can be shaped, rolled, stretched, or sculpted.
- If the clay starts to dry, you can mist the clay with a water bottle and knead the moisture back into the clay. It dries at normal exposure to air and it sets hard overnight or longer, depending on thickness of clay.
- Easy clean-up with soap and water.
|
|
|
| Hints: |
- Makin's
Clay® mixed with water based hand
lotion
If dry hands are absorbing the moisture
out of the clay too rapidly a waterbased
hand lotion/cream can be used prior to
handling the clay. This lotion/cream can
also be used for lubricating the push
moulds and/or texture sheets.
|
|
 |
Rainbow
On Clay |
- Makin's
Clay® can be mixed together to make more
color.
- With
different techniques, such as etching, slicing,
embossing, spiraling, blending, gathering and
mosaics, you can create many different looks.
|
| |
|
 |
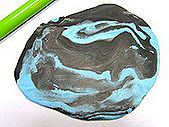
Antique
On Clay |
-
With
techniques such as antiquing, stamping, marbling,
mixing, slicing and blending, you can create
many different looks with Makin's Clay®.
|
| |
|
 |
Crystal
Reflections® (Plastic Shapes) with Clay |
-
Makin's
Clay® molds and bonds to surfaces such
as Crystal Reflections®, wood, glass,
and plastic. Just add a thin coat of adhesive
on the base surface before applying the clay
for best adhesion results.
|
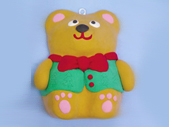
| Beginners'
Techniques : |
| With
the help of our Makin's® tools, such as Push
Molds, Clay Texture Sheets, Clay Cutters, beginners
will find it easy to create layered sculptured designs. |
| |
| Intermediate
Crafters' Techniques : |
| Intermediate
crafters will find our full set of tools combined
with the Clay Mixing Ruler™ creates a large
range of colors to expand their horizons. The projects
help them to develop new techniques as they work
through them. |
| |
| Professional
Crafters' Techniques : |
Professional
crafters can combine their professional skills with
Makin's Clay®, and move onto more advanced methods:
marbling, texturing, bead making, faux-stone effect
and more.
|
|
|
|
|


